
Unlike Adobe Photoshop, the most popular photo editing software, Adobe Illustrator is not specifically created for editing photos. It is more of a designing application widely used for vector graphics. Thus it is more than likely that most photographers will not have used Adobe Illustrator for image editing. But it helps to know that this awesome vector graphics tool also has some options for you as a photographer – apart from carrying out minor edits like cropping, resizing and color change, you can even heavily modify your images beyond recognition. There are several good sites that offer a wide range of tips and tutorials on using Illustrator but you won’t go far enough if you don’t experiment yourself.

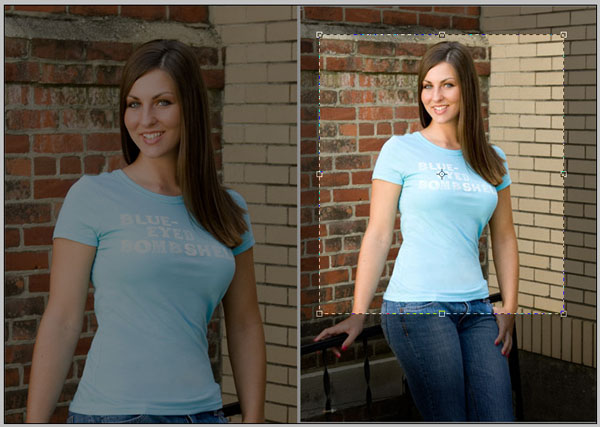
Cropping and Resizing
Just like in Photoshop, you can carry out these functions in Illustrator as well. After you open the image in Illustrator, use the selection tool from the left hand tool bar for resizing and the rectangle tool for cropping.
Resizing: When you click on the selection tool, it will show some additional options in the upper tool bar. Click on Object>Transform>Scale. Enter the percentage you want to resize your image to, in the box next to Uniform. Checking the preview option will allow you to see the result live. You can try out different percentage values. Hit OK when you get the desired size.
Cropping: Select the rectangle tool and drag it over the image. Draw rectangle around the portion you want to retain. Now click the selection tool. Then click on the image while holding down the Shift key. And then click Object>Clipping Mask>Make.
Adding Special Effects
There are a wide variety of effects you can add to your photograph. For example, lighting, vintage, water color, smoke, neon, glow, etc. You can even turn it into a poster or a stamp. Applying special effect in Illustrator is pretty simple:
- Click Effect in the upper toolbar and select the Effect Gallery
- Choose the effect you want to apply
- Try out different effects and click on OK once you are sure you want to apply that particular effect.
Converting to Grayscale and Opaque
If you want to convert your photograph to grayscale, you can make use of Filter; you’ll find it in the upper toolbar. Click on Filter>Colors>Convert to Grayscale and you are done. Similarly, for making your image opaque, all you need to do is go to the Opacity box in the upper toolbar and set the desired percentage of opacity.
Miscellaneous Value Addition
Adobe Illustrator offers unlimited options to play with your picture. You will find it of huge help if you are looking to convert your photographs to sell them as stock photos or art pieces. For instance, you can convert your image into vector artwork. Similarly, you can also create polygonal or other background from your photograph, something like this.
Yet another value addition would be to add your own stylized text to your pictures to make them even more interesting and expressive. You can also add existing vector icons and graphics to your work.
The major advantage of converting photographs into vector graphics is that you can create a realistic piece without having to undergo all the hard work of creating it from the scratch. But nevertheless, you will need the expertise in Illustrator all the way along.
